Easter Button Eggs
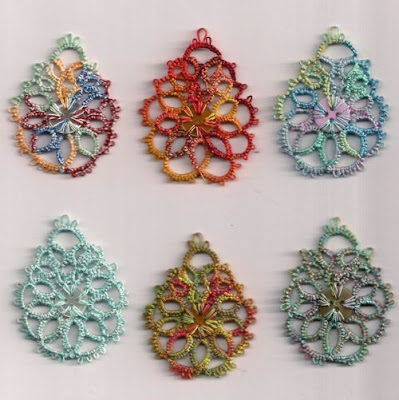
There might be just time, if you can find thread and buttons, to make one or more of these eggs before tomorrow! I have had so much fun making them and giving them away. The six eggs below were made using HWT (hand wound thread). The pattern instructions are loosely based on the buttons and thread sizes given but stitch count can be altered if they do not lie correctly, especially on the first and last chain. Buttons are not all uniform sizes and so for that matter nor is thread! Many thanks for the encouraging comments on my last blog post and I hope you enjoy making them as much as I have.
The larger version with beads
And some were turned into Easter Cards
I hope you all have an egg-citing time making them!
BUTTON
EGG PATTERN © Sally Kerson 2012
Materials
required:- 1 four holed button slightly under ½”
for size 40 thread or slightly over ½”
for size 20 thread.
Abbreviations:
R ring Ch Chain Cl close
p picot LBP long
bead picot vsp very small picot
RW reverse
work + join Cl close
SS SwitCh
shuttle Btnh button hole SCMR self closing mock ring
tc tie
and cut
Starting
at bottom
R1: 6
vsp 6 + (1st Btnh) 6 vsp 6 RW
Ch
: 2 p 2 p 2 p 2 p 2 RW
R2: 6
+ (vsp R1) 6 + (1st
1Btnh) 6 vsp 6 RW
Ch:
2 p 2 p 2 p 2 RW
R3: 4
+ (vsp R2) 6 + (2nd
Btnh) 6 vsp 4 RW
Ch: 2
p 2 p 2 p 2 RW
R4: 4
+ (vsp R3) 6 + (2nd
Btnh) 6 vsp 4 RW
Ch: 2
p 2 RW
R5: 2
+ (vsp R4) 4 vsp 4 vsp 2 RW
Ch: 2
p 2 RW SS
SCMR6: 2
+ (3rd vsp R5) 4 + (2nd vsp R5) SS
R: 4
+ (3rd
Btnh) 4 SS
SCMR6: 4
vsp 4 Cl RW SS
Ch: 6
p (3 graduated p with 2 in-between) 6 RW SS
SCMR7: 4
+ (SCMR6) 4 SS
R: 4
+ (3rd
Btnh) 4 SS
SCMR7: 4
vsp 2 Cl RW SS
Ch: 2
p 2 RW
R8: 2
+ (SMCR7) 4 + (middle of SCMR7) 4 vsp 2 RW
Ch: 2
p 2 RW
R9: 2
+ (vsp R8) 6 + (4th
Btnh) 6 vsp 4 RW
Ch: 2
p 2 p 2 p 2 RW
R10: 4
+ (vsp R9) 6 + (4th
Btnh) 6 vsp 4 RW
Ch: 2
p 2 p 2 p 2 RW
R11: 6
+ (vsp R10) 6 + (1st
Btnh) 6 + (vsp R1) 6 RW
Ch: 2
p 2 p 2 p 2 p 2 tc to base of first R
For
the beaded version add 1 bead to shuttle 1 and 31 beads to shuttle 2
Instead
of the vsps make them large enough to attach a bead except for the 2nd vsp on R5
At
the top of the egg replace the ch after SCMR 6 with 2 bead 2 bead 3
(3 beads and the one bead from shuttle 1) 3 bead 2 bead 2 bead.


Those are very pretty and very Eastery!
ReplyDeleteDie Ostereier sehen wunderschön aus.
ReplyDeleteFrohe Ostern wünscht
Cornelia
Beautiful! I love the colors.
ReplyDeleteThank you for sharing your beautiful pattern! I'll do my best to get at least one tatted for tomorrow.
ReplyDeleteHappy Easter!
Thank you for sharing the pattern. I think they would make great earrings too, with loads of blings in them.
ReplyDeleteThese are terrific! Thank you for the pattern.
ReplyDeleteWishing you and your family a Happy Easter.
Fox : )
I somehow missed your previous post! These eggs are a clever design and so colorful! When in the world did you have time to make so many, and to write down the pattern? This is so generous of you to share! I can't get over the 'hand wound thread' idea. There is no limit anymore to colors and sizes of thread!
ReplyDeleteA very Happy Easter to you and your family!
As you know I test tatted this pattern for you and got addicted to making them!!! Smashing little pattern. SOOOOO pretty. I'll share mine on Monday.
ReplyDeleteSally I think your button eggs are very attractive!
ReplyDeleteLooking forward to seeing some wooden buttons when I'm in the garage has had time to produce some.
Happy Easter.
Anne
Thank you for the pattern!! I will take this challenge!!
ReplyDeleteI found your pattern last evening and was able to tat 6 for our Easter dinner table. Thanks for sharing this cute pattern with all of us.
ReplyDeleteHAPPY EASTER TO YOU AND YOUR FAMILY!!!
Than you for sharing pattern.
ReplyDeleteThese are do beautiful!!!
I love it's colors.
Those are all so very pretty!! :)
ReplyDeleteThis is eggactally what I was looking for :-) Super cute! Thank you, Sally.
ReplyDeleteThank you for all your comments, and pleased that some of you had time to make them! Sorry I did not publish them sooner but I was just overwhelmed with other things (Kathy I could not have done it without the help of Jane who wrote the pattern into a readable form)
ReplyDeleteThese are wonderful! Thank you for sharing the pattern. I've made 3, and have discovered they really are addicting. I'm off to make some more - Thank you!!!!
ReplyDeleteI am trying to tat the Easter egg but I am not understanding the symbols. I am using a ball and shuttle, should it be two shuttles. I am really a beginner. Thanks for some help. I have rings done.
ReplyDeleteMarie you will need two shuttles for this pattern as there is a SCMR (self closing mock ring) in the pattern.
ReplyDeletePlease e.mail me on popabobbinshuttle@gmail.com and I will give you the link for the technique
Thank you so much for sharing the pattern, Easter is right around the corner! Haven't done a a closed mock ring in ages, and only ones, so I will need to practice it again.
ReplyDelete